Hi!
This week I decided to share with you my progress regarding the technical issues I’m trying to improve throughout the game. Here goes another round of minor (or not that minor) fixes:
- Original GC/Wii colours:
As some of you have already noticed, all post-Wii ports suffer from weird and random colour variations compared to the original Gamecube version. This problem only occurs in some areas of the game.
What causes this? It seems there is an additional effect in those areas that wasn’t present in the original version. This effect acts like the noise effect: it engulfs the entire screen and it’s as if you are seeing the game through a slightly red-tinted glass. This causes reddish colours and sometimes even overexposed tones.
I was able to achieve the EXACT same colours and lighting as the original GC/Wii version (running in the Dolphin Emulator) by simply deactivating that effect. And it turned out to be the same incorrect “warm colour” effect I deactivated in the previous “Technical Improvements” post!
As an extra, I have included in the comparison shots the result of using a custom gradient file I made myself when trying to emulate the TV brightness and contrast of playing the game on a real Gamecube/Wii. It’s really simple to generate new gradient files with really accurate results! Just let me know what do you think about it. The 4th gradient originally included in the game will not be needed once all colour corrections are complete, so it can be replaced with whatever we want. 🙂
- Broken water effect:
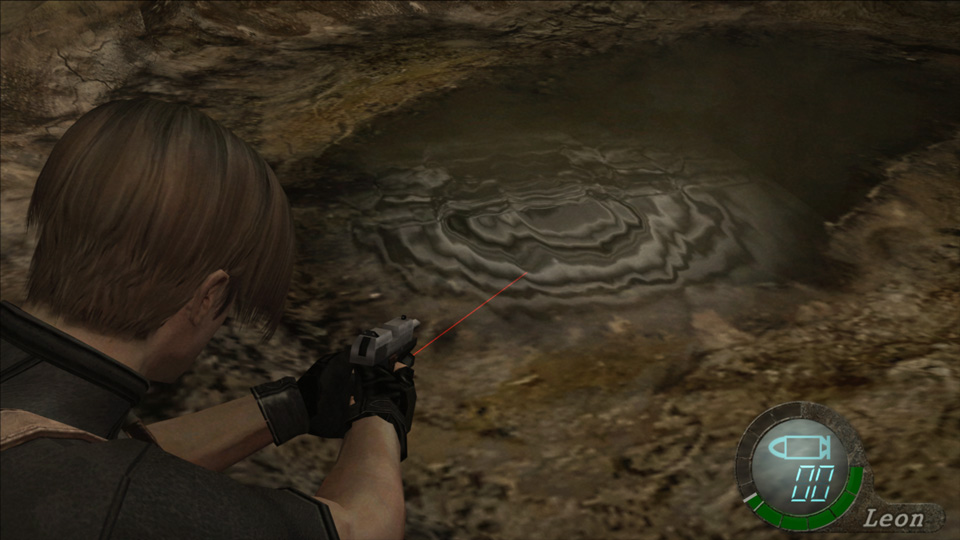
There is one water effect that is obviously broken (there are several kinds of water effects throughout the game). You can find this one in the first cave area and in the water of the Robo-Salazar room.
I found no way of fixing that effect. It seems that whatever caused the distortion is hardcoded somewhere in the .exe and is not related to any specific file of the game. This is just a guess, of course… I can, however, edit several values of the effect inside the room’s EFF file with varying results. What you see in the comparison shots at the bottom of the post is the most decent look I could obtain. Now it no longer looks like Picasso dropped one of his paintings into the water. 😛
- Light bloom effect visible through walls:
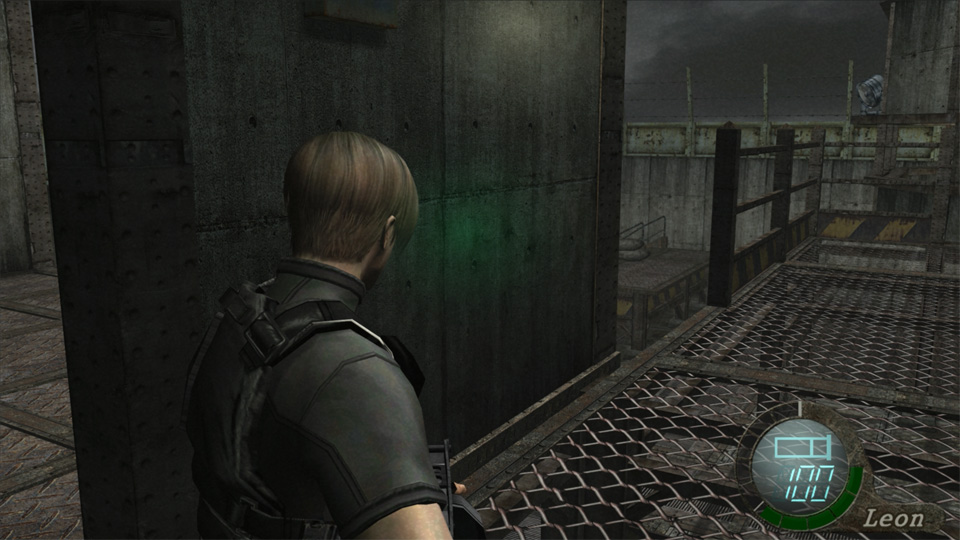
Another annoying issue that caught my attention from the very first day of release: Some lights are visible through some walls when you turn the camera in certain directions.
This problem can’t be fixed either. So I “simply” looked for an alternative: I was able to replace the effect with another bloom effect that is very similar, without that terrible side effect. I was lucky that such a similar effect exists!
- Leon’s static flashlight:
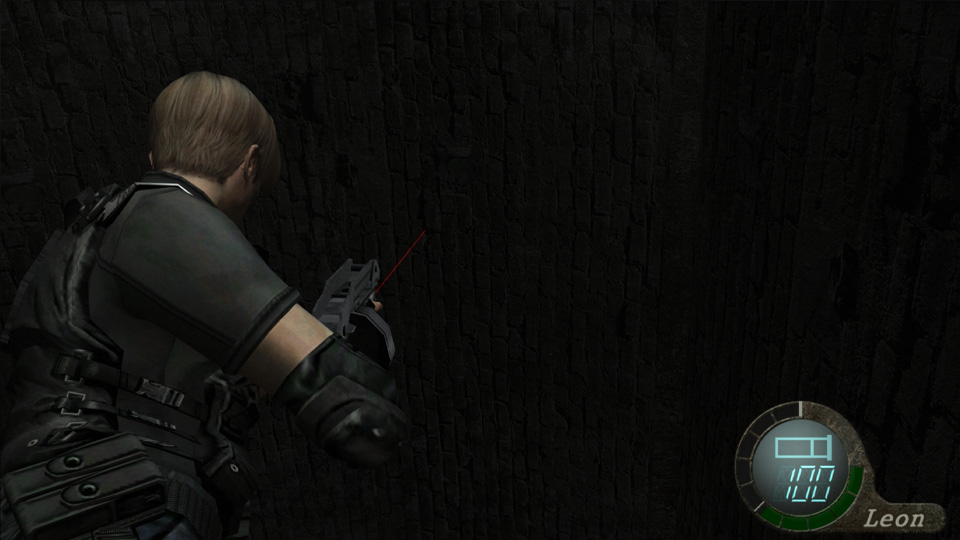
I noticed that Leon aiming up and down in certain areas of the game would make the light from his flashlight to move up and down as well… but not in every room! So after some research I found the bytes that control the flashlight’s behavior and I applied the same values to all of the areas that utilize the flashlight. 🙂
- Enemy shadows appearing too dark:
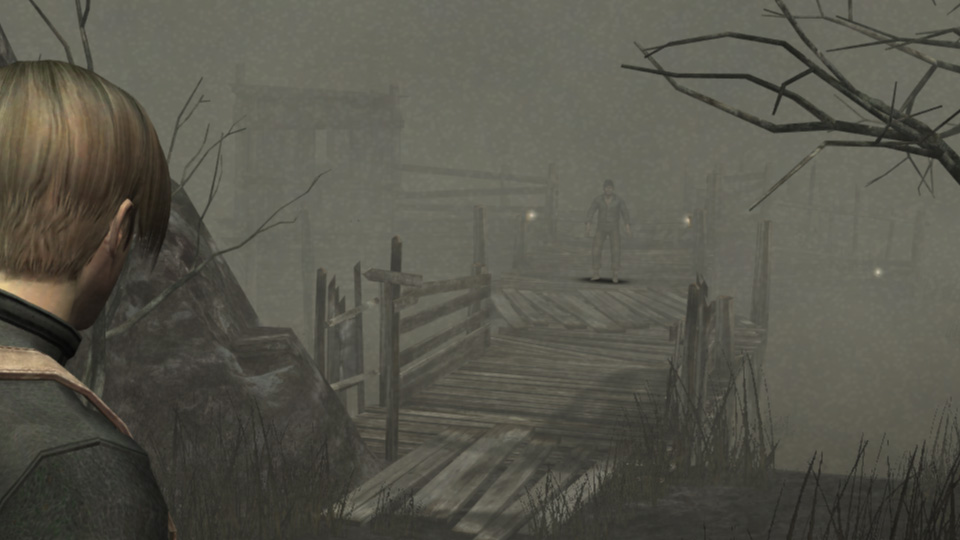
Enemy and character shadows don’t react to fog in the post-Wii ports. This makes their shadows to look extremely dark when you see them at a distance in areas with fog. Everything turns light-grey except for the shadows…
I was able to find the bytes inside the LIT files that control the opacity and the distance at which the player will start seeing these shadows. Every room and every camera angle of every cutscene has its own LIT file. Fortunatelly, it’s quite easy to find and edit those bytes…
And here’s the complete comparison gallery and a video. They will do a better job of explaining the corrections to some of these issues:
[ngg_images source=”galleries” container_ids=”131″ exclusions=”1401,1402,1403,1404,1405″ display_type=”photocrati-nextgen_basic_thumbnails” override_thumbnail_settings=”0″ thumbnail_width=”120″ thumbnail_height=”90″ thumbnail_crop=”1″ images_per_page=”20″ number_of_columns=”0″ ajax_pagination=”0″ show_all_in_lightbox=”0″ use_imagebrowser_effect=”0″ show_slideshow_link=”1″ slideshow_link_text=”[Show slideshow]” template=”/home/content/p3pewpnas04pod08_data05/91/2963091/html/wp-content/plugins/nextgen-gallery/products/photocrati_nextgen/modules/ngglegacy/view/gallery.php” order_by=”sortorder” order_direction=”ASC” returns=”included” maximum_entity_count=”500″]
UPDATE: New water fix attempt:
It’s incredible..I never thought that it will come to this point..fixing some technical issues etc. For me it’s just like Remake now.
Thanks! And there will be a “Part 3” thanks to a discovery I made yesterday :))
The care and attn u put into detail is unprecedented. Now this is wtf I call a ‘real’ remaster. Thanks for ur hardwrk and contributions. S/N: I really like the “Optional Color Filter” you had came up w/, it def gives off a cinematic feel.
Thanks Frank! I like it too but I guess it’s a matter of taste, so I accept suggestions about that filter 🙂
It really is a nice effort, but i think that the original look simply cannot be achieved because of the gamma differences. On GC/Wii skies (around 8OIRE, when cloudy) appears alot brighter while other area, for ex. around 3OIRE, are darker at the same time, something that produce a more tridimensional (and appealing) image as a result. Manage it to looks correct in every instance while avoiding gamma issues at the same time, gamma issues that are also common in every version post Wii by default, it’s nearly impossibile though.
Incredible work as asual anyway Albert.
Thank you for your comments!
It would be interesting to see a non-gamma issue screenshot. Is Dolphin emulation also suffering of gamme issues? I’ve been comparing the results with the Gamecube version emulated via Dolphin and everything looked the same.
Anyway, if those gamma issues can be corrected in Photoshop (by level/curves correcting a PC screenshot) then that correction can be ported to the gradient post process filter file easily. I created a neutral gradient file and I just need to apply the same levels/curves adjustments over the gradient and the game will look exactly the same than the Photoshop-edited screenshot 🙂
Yes, Dolphin is affected as well. It has to be something related to old consoles color space, meant for CRT, translated into modern ones. I’ve tried some quick edit with the pixlr editor online as i don’t have access to photoshop righ now, and i’m using a not calibrated monitor, but again, i remember that i tried some time ago to recreate the exact same look to only find how extremely difficult is to achieve the same brightness at every step of the greyscale only using one layer and curves and avoiding solarization.
First PC, second Wii, third quick edit (i’ve used DF images, PS4 is used as base for the edit but in terms of gamma is no different from the PC one)
http://images.eurogamer.net/2015/articles//a/1/8/5/4/1/1/7/PC_001.bmp.jpg/EG11/quality/90/format/jpg
http://images.eurogamer.net/2015/articles//a/1/8/5/4/1/1/7/Wii_001.bmp.jpg/EG11/quality/90/format/jpg
http://i.imgur.com/Cwxz3k3.jpg
http://images.eurogamer.net/2015/articles//a/1/8/5/4/1/1/7/PC_002.bmp.jpg/EG11/quality/90/format/jpg
http://images.eurogamer.net/2015/articles//a/1/8/5/4/1/1/7/Wii_002.bmp.jpg/EG11/quality/90/format/jpg
http://i.imgur.com/RMUtmOC.jpg
http://images.eurogamer.net/2015/articles//a/1/8/5/4/1/1/7/PC_005.bmp.jpg/EG11/quality/90/format/jpg
http://images.eurogamer.net/2015/articles//a/1/8/5/4/1/1/7/Wii_005.bmp.jpg/EG11/quality/90/format/jpg
http://i.imgur.com/6Dz5rbt.jpg
Not even close. And the funny thing is that i was easily able to recreate the exact same image, with 1:1 luminance at every step and avoiding every issues, but only by calibrating a specific Panasonic VT50 plasma preset. But that’s due to the insane amount of control over the gamma, i don’t think i could do that with Photoshop’s curves.
Oh hehe those Wii screenshots were the reference I used to create the custom gradient file. And this is the result I got:
http://oi66.tinypic.com/8znt02.jpg
I thinks it’s pretty close to the CRT TV colours 🙂
What do you guys think?
I repeat: This would be an optional gradient filter that can be turned on and off. This is how the game colours would look like with the filter off:
http://oi66.tinypic.com/2e3u2af.jpg
Thank you Vick!
That looks perfect Albert, and you have managed to keep the subtle highlights on hairs and jacket without a 10 Point control and avoiding solarization, i’m impressed. It is stable, or in some instances gamma issues manifest themselves?
Ok, i’m watching the video again and i’m confused. Your last screenshot looked perfect compared to the DF screenshot of the PC version, since skies are alot brighter (as they should) and dark areas darker. But i’m seeing now that that’s not happening in the video, and it’s quite the opposite in fact, luminance because of the new grading take a hit instead of a boost, and everything appear more bidimensional.
It’s a matter of capture, since your not-graded PC screenshot looks better than the DF one anyway. I think you should try a different approach when you’re dealing with the white crush fix.
Oh in the video I didn’t show the optional gradient. Just the colour fix (that effect that make some rooms reddish)
The gradient results are visible only in the comparison shots posted here in our site 😉
I personally prefer the non-gradient version. The gradient option is just for people who want to play the game with TV colours that recall the original Gamecube/Wii experience. And I thought that option was something interesting to share 🙂
I agree, but just because the gradient (the way i’m gonna play this) it’s not perfect yet, i think that the combination of colour fix+white crush fix (i hope that this one can be optional) interferes with a proper optional “CG/Wii/CRT” filer. What i mean is that even with the gradient, skies and highlights are 2 or 3 step darker than original PC with original colours, instead of 5 step brighter. And i’m not talking about 100IRE highlights, which are part of the white crush fix, but things around 70-80, they should be brighter. Another option could consist in just remove the white crush fix in order to maintain highlights more in line with the GC/Wii version rather than the Dolphin’s and go with that plus the colour fix.
Something like this, it has a different look and i’ve always LOVED it. 🙂
http://i106.photobucket.com/albums/m257/lumibrat/Fireplace.jpg~original
http://www.cheatcc.com/imagesfeatures/nostalgicquips_residentevil4_0.jpg
http://www.residentevilsaga.it/pages/re4/screenshots/gc_06.jpg
http://swankworld.net/Games/gamecube/re4/images/Enemy05.jpg
Oh I forgot to mention… The white-crush fix is no longer needed. I won’t edit the overall lighting of any room. For more details… Next Technical Improvements post 😛
Anyway that fix was only applied on that room in previous Technical Improvements post.
And I agree the gradient I’m using in these comparison shots is too dark. But I can easily fix that while keeping the TV colours/brightness feeling 🙂
The problem with these screenshots is they are completely different fom the previous ones. The TV, cables, capture device… all affect the colours, brightness and contrast of the screenshot. It’s impossible to be true to all the old CG/Wii screenshots at the same time… :/
I think this gradient looks great, Albert.
Thanks! It needs some adjustments but I’m glad you liked it!
When can we have it? 1 year or 2 years later or never like Half Life 3 😉
We don’t know when it will be released uet. But we are just doing our best to get the best looking re4 experience possible 😉
Water effect in this room looks good enough. I wonder if you can do something with other rooms as well, especially this particular one: http://i.imgur.com/zBYv7xg.png
It’s completely bizarre in-game. Same with the lake.
And finally, fixed shadows and GC gamma! Now that’s exactly what I wanted to see 🙂
By the way, video is still unlisted and not embedded here properly.
Oh yeah! Both are in my “let’s-see-what-can-I-do-about-that” list
Thanks! I fixed the video 😛 I was too sleepy
Simply incredible!
You hard work WILL NOT go unappreciated.
Every update is pure bliss and joy.
Keep up the amazing and beautiful work!
Thanks Daniel! 😀
The flashlight angle thing has me wondering… It must have been intentional, right? So why would they lock it sometimes and not lock it other times? Why would some minor thing related to player controls be attached to the level data? I’ve got a theory you can test… do they only permit angling the flashlight up in encounters with enemies at different terrain heights? Could it have been a subtle way to let the player know when they need to pay attention to possible threats from above?
Good point! I don’t have a complete list of rooms using the flashlight but in cells room with the Regeneratos (video) there are 2 different heights but the positional light was deactivated.
I’ll try to find out the logic used in the use of this feature.
Light bloom effect visible through walls
This is not an issue if you turn on MSAA! I think that’s much better solution that editing bloom effect. I’ve tried this multiple times and it worked, at least on nVidia cards.
Oh! Are you sure? I have a Nvidia GTX 750 Ti card but this option is not in the list… :/ so I can’t check it by myself
Thanks!
But it’s not only the lights are visible trough walls. Those bloom efects disapear when you turn the camera to certain directions.. It’s a weird issue…
That’s weird, there has to be Anti-Aliasing option in video settings. Here’s what I meant:
https://s11.postimg.org/6cfbq2n37/re4.png
It seems to me that this is the same issue, no?
Yes, that’s the same 🙂
I have some antialiasing options but not the MSAA:
http://i64.tinypic.com/30hvjuv.jpg
In Spanish Nvidia config MSAA is called: “AA muestreado de fotogramas múltiples” as you can see here:
http://i.imgur.com/rvgT4rc.png
I tried activating anything else but the issue ramains
So… is there another way of getting the same results? ;P
Thanks!!
Please try in-game Anti Aliasing setting in video options. I’ll get into more detail when I get home.
Here’s anti-aliasing stuff.
https://s18.postimg.org/5cjqnzqqx/reeee.png
it works good even on old 8600GT and at 30 fps. fps doesn’t make a difference for me.
Can you send a screenshot of a specific light problems here, I wanna check those exact places myself.
Thank you again!
Unfortunatelly I don’t have the MSAA option. The rest is all the same but no MSAA in my card config :/
The screenshots you provided are good examples. Anyway, here’s another one.
http://i64.tinypic.com/2ev6tky.png
The bloom effect are visible through walls when you turn the camera to the left.
Thanks, I’ll checkout that location when i get the chance.
Just to be clear, you’re missing AA option in RE4 video settings, but not in nVidia control panel (it seems to be there in the screenshot you posted earlier)? Is your game exe version 1.06? Can you grab a “fresh” exe file and try?
Also, try forcing AA trough nVidia control panel.
“Antialiasing – Modo” should be set to override
“Antialiasing – Configuracion” should be set to 4x
MY RE4 config is ok and yes, it’s 1.06 🙂
Just the Multi-framed sampled AA (MFAA) option in my nvidia control panel is missing. Sorry All the time I meant “MFAA” … a recurrent typo haha
My video card doesn’t support MFAA
The rest of anti aliasing options are there
I tried “Antialiasing – Modo” override + “Antialiasing – Configuracion” 4x but nothing happened. The effect is still broken
You have that MFAA option in your screenshot activated. Maybe that’s what makes the difference ¿?
Thank you again!
That’s so annoying! No, MFAA is a new thing introduced in newer drivers that came out recently.
Maybe you broke AA with all the heavy modifications that you made to the game 😀 Last thing to try is an untouched version of the game, without any mods. :p
Some torches do this at night. In the village there are lit torches out side buildings that push their light through walls & light up interiors, its a really annoying flaw that cant be unseen once noticed. I first noticed the flash light bug when I get to control Ashley. I tried to make her point her flashlight at the armoured knights that line up the walls only to discover that nothing she faces actually lights up! The flash light is just there for effect & its a half assed crappy effect at that lmao, I am looking forward to seeing what you have been able to achieve with the flash light & am very curious about how much you can improve the waters in this game. Sorry to read about the cris situation, fingers crossed for all of you, best wishes & good luck to all of you as always.
OH MY GOD! Albert, you made a really great job! Congratulations!
Why showing an optionnal filter ? they are already optionnal filters in the game.
This is a custom filter I made by myself trying to emulate the GC/Wii console versions played on a TV. It’s just a test and I wanted to know everyone’s thoughts and suggestions 😉
I think the colour corrections are a godsend. As far as the custom gradient file is concerned, I think it may be tricky to get something universally perfect. Everybody has different monitors with varying gamma settings. You don’t want to “crush” black levels to the point where texture detail is obscured.
It’s a shame about the water. Your fix looks great in the still but it’s just a little too animated in motion. Like the water is being vibrated by something. Still a vast improvement of course. Thanks again for being so invested in this project.
That’s the goal: A gradient that just makes the image more appealing and contrasted while keeping the whites and blacks untouched 🙂
I agree about the water. Here’s a second attempt that resembles the original GC water effect in that room:
https://youtu.be/jQCRwjrhxbM
Thank you for the commnets!!
>https://youtu.be/jQCRwjrhxbM
This seems to be a much better than your previous result.
Great work. That’s a big improvement. It looks a lot more natural now.
Well i hope you will keep it as an option. There are enough of those “sweetFX” on the internet.
hi ,
the Original GC/Wii colours look great 😉
very nice work again !!
Would it be possible to put your textures separately to Ultimate HD? And why do you only work with the version of 2007? With Ultimate HD 2014 would be less.
Hi!
We are working with 2014 UHD version 😉
Greetings!
Sorry, I’m not particularly watching the project.
And u know what the guys from “moddb” r doing a Restoration Project for the RE3? Enhance the quality of backgrounds and stuff. You do not want to help them?
Nice work, as usual, Albert.
Are colour effects optional or permanent? I really like your project, but to be honest, I like UHD brown palette more, than original greyish.
Anyway, you made amazing work.
Thank you!!
Colour fix is permanent. I simply removed a reddish filter that was in some random rooms with no logical explanation making those areas more red and overexposed than the original Gamecube/Wii version while other areas have the same exact original colours. Anyway it’s quite easy to create a custom gradient file that would make the entire game more red like some of those UHD areas (I think PS3 X360 had that issue too). I could make it in 5 min for people who like the original UHD colours 🙂
Wow, this second water fix looks REALLY good. I think it can safely stay in the final release.
As for other things, it’s all high-quality work, as always. Really enjoying the original colours.
great work man!! keep the good work
Hello.
thanks for fixed water effect!
please hd texture all water in game,,for example in this area:
http://s6.uplod.ir/i/00856/pc3b75i7m3se.png
http://s6.uplod.ir/i/00856/czbe4styfjgi.png
please improve ‘Rain’ texture in game,,for example:
http://s6.uplod.ir/i/00856/dtdcv8xfs6n1.png
http://s6.uplod.ir/i/00856/o6socrtyb7tu.png
note: screenshot of original version (2005).
thanks for everything.
Hi!
UHD (2014) and Ubisoft (2007) ports have completelly different effects. But we’ll do everything we can to improve them;)
Thanks for following us!
Hi Albert! It’s amazing that you’re still working on this and it looks good.
Will it be possible to apply your color filters to the original SD texture set in the game (by copying some files I assume)? I still enjoy the original textures (not to put down your work) but I want it to look as close to GC as possible when using them. Thank you sir!
Hello Luke,
In fact, it will be impossible to play the SD textures without all 3D edits, lighting and effect adjustments after the installation (unless you unistall the project of course). So, when you select the original SD option you will be able to enjoy all the project features but the textures.
The reason is there are 2 sets of textures per room in the game folder (SD and HD) but all 3D data, lighting and effects is just one file per stage.
Cool! Thanks for the response. and all the work!