resident evil 4 HD project
Our effort to create a true HD experience for Resident Evil 4
Version 1.1
Please, read the Instructions before downloading and installing the pack.
PLEASE, READ THE ENTIRE PAGE BEFORE DOWNLOADING AND INSTALLING THIS PACKWHAT YOU NEED TO KNOWThis is not a remake, it’s a remaster created by fans, for fans.
You need to have an installed copy of the resident evil 4 PC port, released on Steam in 2014.
The “resident evil 4 HD project” is a complete graphical remaster of the entire game. It includes enhanced textures, 3D models, menus, cutscenes, prerendered videos, lighting, visual effects, and more.
The HD project also fixes certain sound bugs and broken / missing effects, which arose mainly as a consequence of the many times the game has been ported through the years.
This package doesn’t include the entire game, only the files to upgrade the game.
The HD project is compatible with all languages, including the Japanese version. It’s tested for version 1.0.6 & 1.1.0
Some mods are not compatible with this project. Please ask the modders who created your favorite mods to adapt them to the HD project if needed.
This HD pack won’t affect achievements or game saves.SYSTEM REQUIREMENTSProcessor: Intel® CoreTM 2 Quad 2,7 GHz or higher, AMD PhenomTM II X4 3 GHz or higher
RAM: 4 GB
Video Card RAM: 2GB (minimum)
HDD: 38 GB (approximately)INSTALLATIONHD project 1.1 includes re4tweaks 1.7.7.3 created by “nipkow” and “emoose”! The installer (also courtesy of nipkow) will ask you if you want it to check for a newer re4tweaks version. Please, follow these steps for a correct installationGet an original copy of the game on Steam and install it.
Get the HD project 1.1 from the links above (direct download and Torrent options are available).
Unpack “HDProject1.1-Installer.rar” PASSWORD: re4hdproject. (Not needed for the Torrent download method.)
These are the files you should have after downloading the HD project. Place them all in one same folder like this:
Run “re4HDProject-setup.exe”. Read and follow the installer steps.
Find YOUR game installation path. The installer has a path by default, but this is NOT your game’s path, it’s just an example. The usual path is:
C:\Program Files (x86)\Steam teamapps\common\Resident Evil 4
If the installer can’t find the BIO4 folder, then it’s located in another folder. You’ll have to find it.
Wait until the installation is finished.
Linux users need to add WINEDLLOVERRIDES=”dinput8=n,b” %command% into Resident Evil 4’s Steams launch options in order for the game to work on Linux and Steam Deck using Proton. STEAM DECK USERS, CHECK THIS PAGE, PLEASE.
Run the game. You’ll get a message that will warn you about the EXE file not being patched with the 4GBpatch. Click on “YES” to patch the EXE and restart the game.
And that’s it! You can run the game with all the HD project improvements. BRIGHTNESS (in game Options when the game is running) should be set to the MAX in order to get the best visuals.CHANGELOG v.1.1Hundreds of graphical edits based on people’s feedback. (textures, stage and character models, items, weapons, UI)
Dozens of other graphical edits spot on the fly.
Remastered “press any button” “how to play” “options” and “controls” UI text in the title screen for all languages.
Titles screen UI font replaced to match the original font.
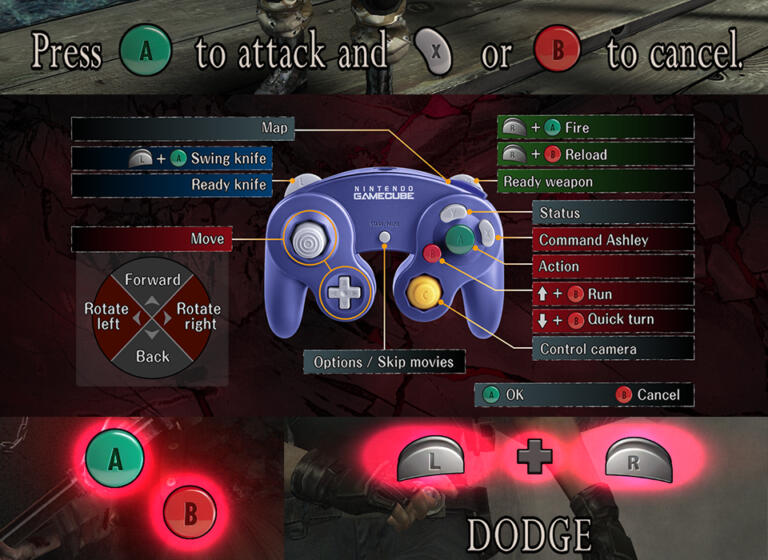
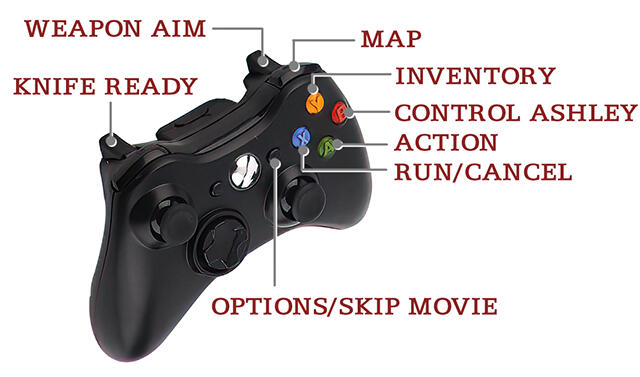
Remastered “How to play”, “Controls” and Xbox control settings UI textures for all languages.
Some corrections on Spanish subtitles.
Inclusion of latest re4tweaks (1.7.7.3) by nipkow and emoose.
English Subtitles during all cutscenes.
Check all the latest re4tweaks features HERE.FUTURE UPDATESBased on feedback and visual bugs people find, there will be future patches that correct these issues. If some major issue is found, an immediate patch will be released.***************DOWNLOAD LINKSDIRECT DOWNLOAD: Mega: DOWNLOAD | MediaFire: DOWNLOADRegardless of whether you are downloading from Mega or MediaFire the files are the same. This means that you can combine parts downloaded from different sites. Total file size: 34,2 GBTORRENT: MIRROR 1 | MIRROR 2 | MAGNET LINK
POR FAVOR, LEE TODA LA PÁGINA ANTES DE DESCARGAR E INSTALAR ESTE PAQUETELO QUE NECESITAS SABEREsto no es un Remake, es un Remaster creado por fans y para fans.
Necesitas una copia previamente instalada del port de resident evil 4 para PC lanzado en Steam en 2014.
El “resident evil 4 HD project” es una remasterización gráfica completa de todo el juego. Incluye texturas mejoradas, modelos 3D, menús, cinemáticas, videos prerenderizados, iluminación, efectos visuales y más…
El “HD project” también corrige ciertos errores de sonido y efectos visuales rotos / faltantes, en su mayoría a consecuencia de los diversos procesos de portabilidad por los que pasó este juego a lo largo de los años.
Este pack no incluye el juego completo, solo los archivos para mejorar el juego.
Algunos mods no son compatibles con este proyecto. Por favor, pide a los modders que crearon tus mods favoritos que los adapten al “HD project” si es necesario.
Este paquete HD no afectará los logros/trofeos ni las partidas guardadas.REQUISITOS DEL SISTEMAProcesador: Intel® CoreTM 2 Quad 2,7 GHz o superior, AMD PhenomTM II X4 3 GHz o superior
RAM: 4 GB
RAM de la tarjeta de video: mínimo 2 GB
Disco duro: alrededor de 38 GBINSTALACIÓNEl HD project 1.1 incluye el re4tweaks 1.7.7.3 creado por “nipkow” y “emoose”! El instalador (también cortesía de nipkow) te preguntará si quieres descargar la versión más reciente del re4tweaks. Por favor, sigues los siguientes pasos para una correcta instalación:Obtén e instala una copia original de resident evil 4 en Steam.
Descarga el “HD project” en los enlaces de arriba. (Descarga directa o Torrent.)
Descomprime “HDProject1.1-Installer.rar” CONTRASEÑA: re4hdproject. (No necesario para la opción de descarga Torrent.)
Estos son los archivos que deberías tener tras descargar el HD project. Ponlos todos en una misma carpeta así:
Ejecuta “re4HDProject-setup.exe”. Lee y sigue los pasos de instalación.
Localiza TU ruta de instalación del juego. El instalador tiene una ruta por defecto, pero NO ES TU RUTAL, es solo un ejemplo. La más habitual es:
C:\Program Files (x86)\Steam teamapps\common\Resident Evil 4
Si el instalador no puede encontrar la carpeta BIO4, entonces está ubicada en otra ruta. Tendrás que encontrarla.
Espera a que la instalación termine.
Usuarios de Linux necesitarán añadir WINEDLLOVERRIDES=”dinput8=n,b” %command% en las opciones de ejecución de Steam de Resident Evil 4’s para que el juego funcione en Linux y en Steam Deck usando Proton. USUARIOS DE STEAM DECK, POR FAVOR, CONSULTAR ESTA PÁGINA.
Abre el juego. Un mensaje aparecerá y te indicará que el juego necesita ser parcheado. Clica en “Yes” y te pedirá que reinicies el juego.
¡Ya está! Ya puedes ejecutar el juego con todas las mejoras del HD project. El BRILLO (en Opciones del juego cuando ejecutes el juego) tiene que estar al MÁXIMO para obtener la mejor experiencia visual.CHANGELOG v.1.1Cientos de retoques gráficos a partir del feedback de la gente (texturas, models de escenario y personajes, objetos, armas, UI)
Decenas de otras mejoras pilladas al vuelo durante el proceso del punto anterior.
Textos de “pulsa cualquier botón” “cómo se juega” “opciones” y “controles” del menú de inicio remasterizados en todos los idiomas.
Tipografía de los textos de los menús principales cambiada para ajustarse a la tipografía original.
Texturas de los apartados “Cómo se juega”, “Controles” y la configuración del mando Xbox remasterizadas en todos los idiomas.
Revisión de los subtítulos en castellano.
Inclusión de la última versión de re4tweaks (1.7.7.3) de nipkow y emoose.
Subtítulos en inglés durante las cinemáticas.
Puedes comprobar las características nuevas del re4tweaks AQUÍ.ACTUALIZACIONES FUTURASSegún los comentarios y los errores visuales que encuentre la gente, habrá parches futuros que corrijan estos problemas. Si se encuentra algún problema importante, se lanzará un parche de inmediato.****************LINKS DE DESCARGADESCARGA DIRECTA: Mega: DOWNLOAD | MediaFire: DOWNLOADLos archivos son los mismos, los descargues de Mega o de MediaFire. Esto significa que puedes descargarte unos cuantos de un sitio y los otros del otro. Tamaño total de los archivos: 34,2 GBTORRENT: MIRROR 1 | MIRROR 2 | MAGNET LINK
BONUS
These are optional packages that you may be interested in.We may create more of these if there is enough demand and if they would match the experience of a faithful HD remaster. And NO, we won’t create nude Ashley mods or things like that. XD

BRAZILIAN PORTUGUESE TRANSLATION PACKCredits: OAleex, Lucaz "BIG BOSS" Andrade, João13
Tools: JADERLINK, emooseYou need to fully install HD project 1.1 first, It won't work on the vanilla gameThis pack is a meticulous translation work created by professional translators that aims to bring a definitive experience to this language with the game. From the cretors of BR-PT patch for Silent Hill 2 Enhanced Edition!DOWNLOAD HEREPACOTE DE TRADUÇÃO PARA O PORTUGUÊS BRASILEIROCréditos: OAleex, Lucaz "BIG BOSS" Andrade, João13
Ferramentas: JADERLINK, emoosePrimeiro, você precisa instalar o HD Project 1.1 completamente. Ele não funcionará no jogo vanilla.Este pacote é um trabalho de tradução meticuloso criado por tradutores profissionais que visa
trazer uma experiência definitiva para este idioma com o jogo.
Dos criadores do patch PT-BR para Silent Hill 2 Enhanced Edition!BAIXE O PACOTE AQUI


GAMECUBE CONTROLLER BUTTON PACK + BUTTON REMAPDo you have a GameCube or a Gamecube-for-the-Switch pad? Do you want to experience the game like you were playing it on the original GameCube? Do you have the typical XBOX pad, but you want to press the buttons you used to press when playing on the GameCube?Then this is the Bonus content you were looking for!Here you’ll find a GameCube button pack compatible with HD project 1.1. The download contains:158 files inside the BIO4 folder (1,11 GB).
Compatibility patches for other HD project 1.1 mods available in this page.
Installation instructions.
It includes the “input.ini” file that will remap your controller. Use “Type I” if you have a GameCube or Switch pad. Use “Type II” or “Type III” if you have an XBOX pad (or similar).
GAMECUBE BUTTONS DOWNLOAD: MEGA | MEDIAFIREIn case you want to uninstall it, please, download the original XBOX buttons UI pack here:ORIGINAL XBOX BUTTONS DOWNLOAD: MEGA | MEDIAFIRE
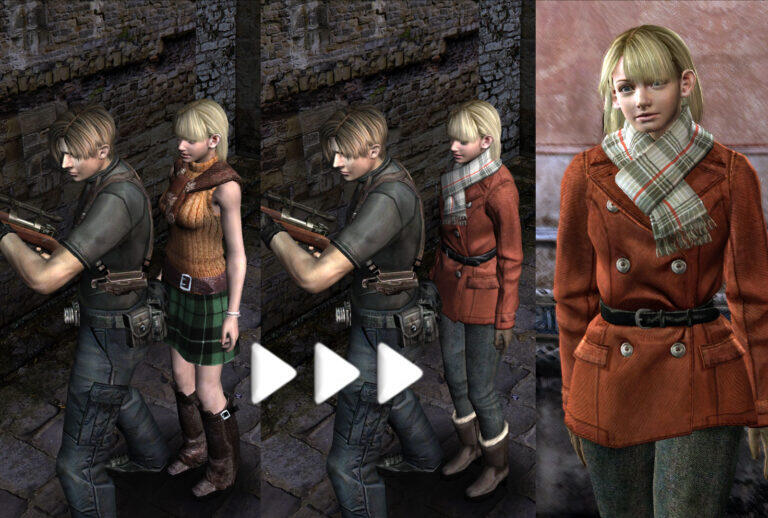
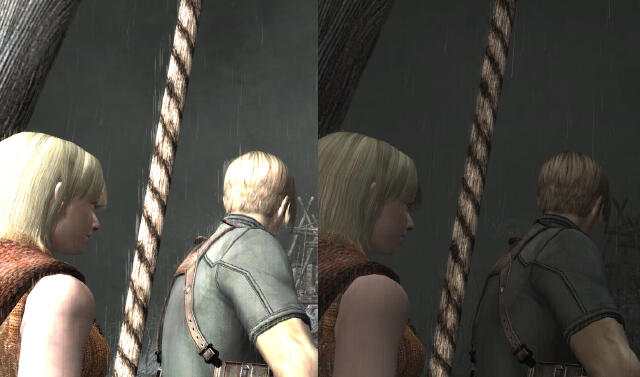
ASHLEY’S “OTOÑO” COSTUME | BETA DESIGN (NORMAL COSTUME REPLACEMENT)This Mod will replace Ashley’s Normal Costume ingame and during cutscenes with the unused Beta design found among the game’s files. The model has been adjusted and remastered to fit the HD project 1.1. The download contains:Otoño Ashley files
Compatibility patches for other HD project mods
Backup files to restore Normal Ashley
Installation instructions
DOWNLOAD: MEGA | MEDIAFIRE
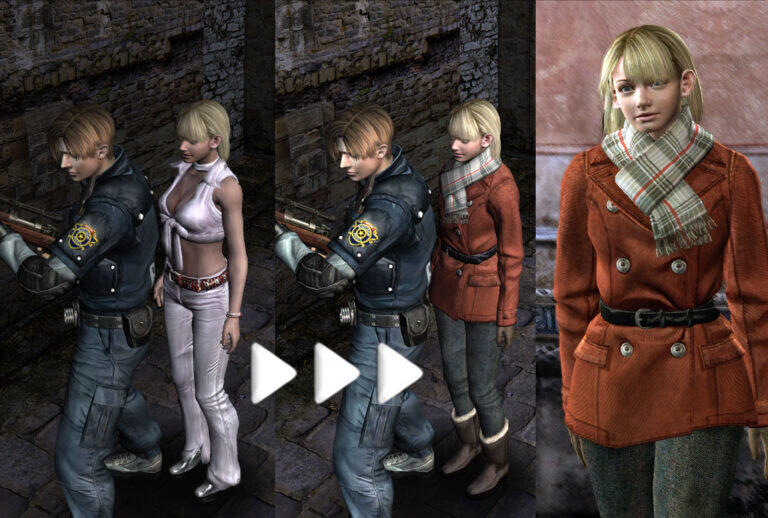
ASHLEY’S “OTOÑO” COSTUME | BETA DESIGN (SPECIAL 1 COSTUME REPLACEMENT)This Mod will replace Ashley’s Specia 1 Costume (Pop Star) ingame and during cutscenes with the unused Beta design found among the game’s files. The model has been adjusted and remastered to fit the HD project 1.1. The download contains:Otoño Ashley files
Compatibility patches for other HD project mods
Backup files to restore Special 1 Ashley
Installation instructions
DOWNLOAD: MEGA | MEDIAFIRE
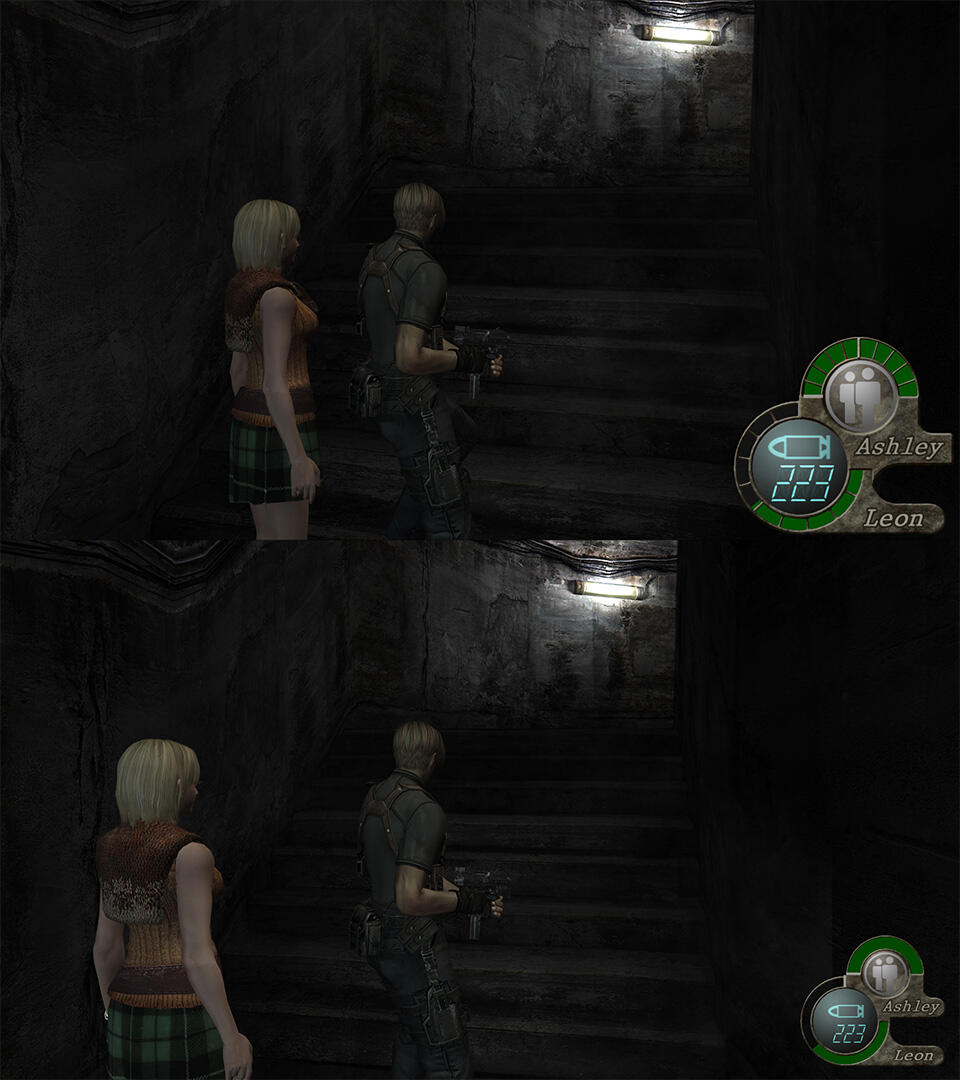
SMALLER, SIMPLIFIED and DEACTIVATED HUD MODSThe original HUD size seems too big for HD resolutions. Here’s a solution. The download contains:Smaller and Simplified HUD files
Smaller but Original Design HUD files
Deactivated HUD file
Normal HUD (Backup files)
Installation instructions
DOWNLOAD: MEGA | MEDIAFIRE
“ANTI-PHOTOSENSITIVE EPILEPSY” LIGHTS & EFFECTS PACK FOR HD PROJECT 1.1This patch removes most lightning effects during stormy areas and deactivate the flickering effect of all game’s lights. Please, let me know if I forgot something or if there are other annoying visual effects! The download pack includesEdited cutscene EVD files.
Edited stage UDAS files.
Backup files.
Installation instructions.
DOWNLOAD: MEGA | MEDIAFIRE
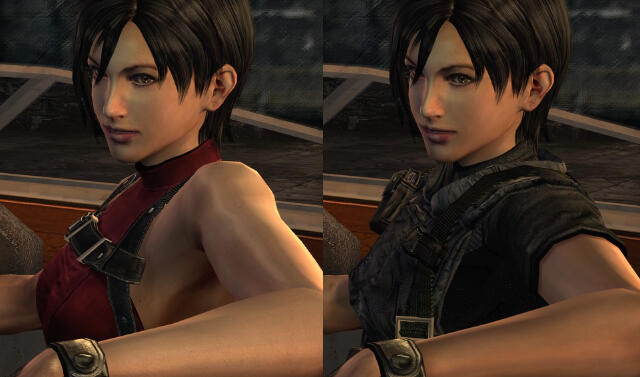
ORIGINAL ASSIGNMENT ADA COSTUME DURING SPECIAL 1 COSTUME CUTSCENESThe HD project replaces Ada’s outfit during cutscenes when Leon wears his RPD uniform. Now she wears her RE2 outfit. If you prefer her original spy costume during those cutscenes, you can download it here. The download contains:The spy costume files.
Installation instructions.
The RE2 outfit files in case you change your mind.
DOWNLOAD: MEGA | MEDIAFIRE
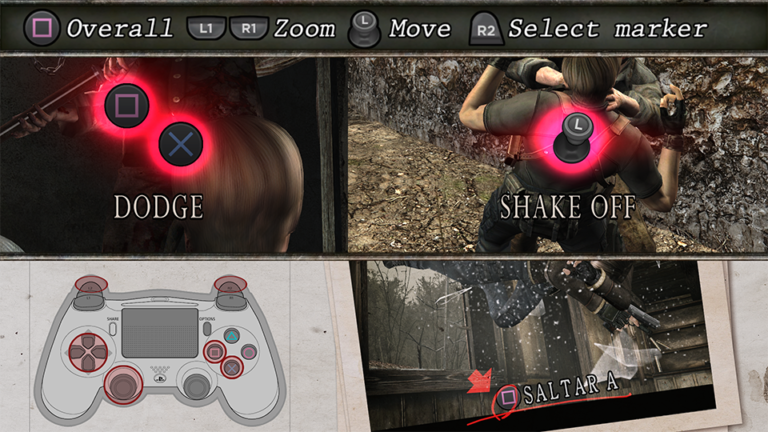
PLAYSTATION CONTROLLER UI PACKHere you’ll find a PlayStation button pack compatible with HD project 1.1. The download contains:3 subfolders (149 files).
Installation instructions.
PS BUTTONS DOWNLOAD: MEGA | MEDIAFIREIn case you want to uninstall it, please, download the original XBOX buttons UI pack here:ORIGINAL XBOX BUTTONS (BACKUP FILES) DOWNLOAD: MEGA | MEDIAFIREPATCH: PS buttons + Simplified HUD design at the same time: MEGA | MEDIAFIRE
GAMECUBE CONTROLLER BUTTON SCHEMENOTE: it doesn’t include button textures, it only will remap your controller buttons.For years, I’ve been using an input.ini file that changes the controller button scheme to match the GameCube one when using an XBOX 360 controller. I can’t remember who created it, but it feels great if you are used to the GameCube button scheme… The only problem is when the game asks you to press “A” you’ll have to press “X” and vice versa. The download contains:The input.ini file.
Installation instructions.
DOWNLOAD: MEGA | MEDIAFIRE
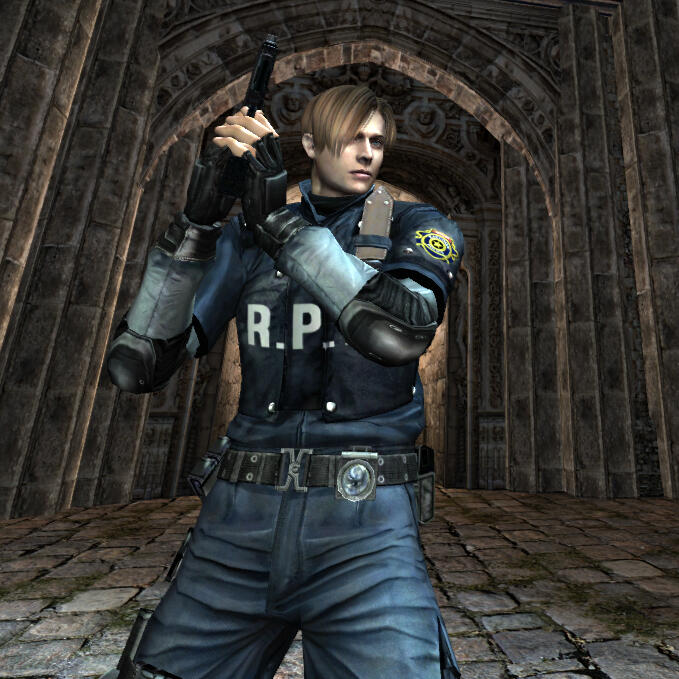
CLASSIC R.P.D. COLOR SCHEMEThis will replace Leon’s RPD textures to something closer to the 1998 PSX colors:New colors and backup files.
Installation instructions.
DOWNLOAD: MEGA | MEDIAFIRE
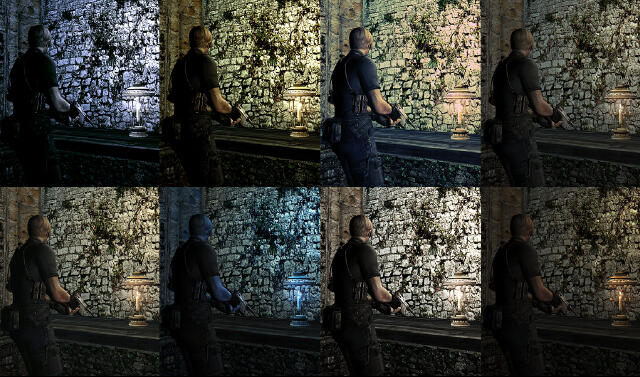
ORIGINAL AND HD PROJECT COLOR GRADIENT FILESIn case you want to use the original post-process color filters, you can download them here. This pack includes:Original color/gradient filters.
HD project color/gradient filters (in case you change your mind).
Preview image of the gradients.
DOWNLOAD: MEGA | MEDIAFIRE
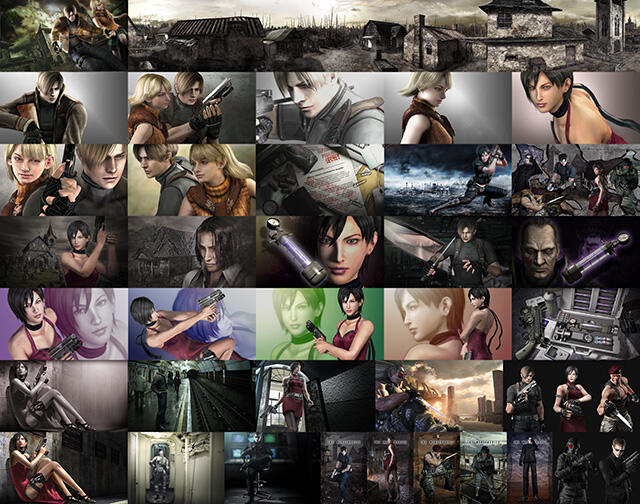
HD PROJECT RENDERS COLLECTIONThis is the complete final version collection of all the remastered renders created for the HD project. It includes Title, End of Chapter, Mercenaries, Separate Ways and Result Screen images. Images size is around 5120 x 2880pxDOWNLOAD: MEGA | MEDIAFIRE
UNROLLED PAPERS 3D MODEL IN ROOM r113I had this version of the nighttime farm file 3D model forgotten among my HD project folders. This small patch contains:Unrolled version of the file (+ slightly edited texture).
Backup file to restore rolled version.
Installation instructions.
DOWNLOAD: MEGA | MEDIAFIRE
ABOUT THIS PROJECT
Who are we?
We’re two guys who love Resident Evil 4 and want to help create the definitive graphical experience for the game. Cris is from the Midwest in the US, while Albert lives in Spain. Albert’s experience goes all the way back to the 2007 PC release of the game, for which he created one of the most complete and well-received texture packs, while this is Cris’ first effort.During the time this project’s been on development, a lot of people helped us: Among them, “Son of Persia”, “nipkow” and “emoose” are the main coders that made possible a lot of the improvements included in this project.What's resident evil 4 HD Project about?
1. Restoring the visuals using the original real world sources. In preparation for the original game, Capcom gathered texture assets by photographing a variety of real-world locations, primarily throughout Spain and Wales. For this project, Albert has gone to these same locations to gather higher resolution assets. The result is a visual experience that is as true to the original game as possible, presented in resolutions up to 16 times that of the original game.2. Correcting texture mapping and 3D modeling issues. Texture mapping and 3D modeling errors that weren’t noticeable in the original game being played on a CRT television become more apparent when playing in HD resolutions. Examples include objects floating above the surface they should rest on, improperly placed shadow layers, seams appearing where textures are supposed to flow continuously. We are correct these issues throughout the game.3. Enhancing flat objects to true 3D models. Due to limitations of the original hardware, objects like lamps, candle-holders, doors, decorative emblems, etc. were originally created as flat objects. In many instances, we are able to revise these objects to be true 3D models, observable from any angle.4. Remaining committed to the original visuals. Our intent throughout the project is to remain true to the original visuals and artistic intent. The best kind of feedback we receive is when people say that the game looks like what they imagined it to look like when they first played it 10 years ago. While we are not perfect, we continually refer back to the original texture assets to ensure we do not deviate significantly.5. Improving lighting, visual effects, collision inaccuracies and prerendered cutscenes. Thanks to Son of Persia and the tools he developed, we’ve been able to edit all this kind of stuff and raise this project to a new level of perfectionism. Also, Separate Ways prerendered videos and the very few videos in the main campaign have been remastered using all kind of methods: from automate AI upscaling to complete re-creation.What versions of the game will this work on?
The HD project is compatible with the Steam PC port of Resident Evil 4.Is the project finished?
resident evil 4 HD project (ver. 1.1) released on 7.26.2022 is the latest version and could be considered final for now. If the time allows it, there might be some refinement work in the future, but it depends mostly on the available free time.What are the System Requirements for this Project?
The greatest increase in hardware requirements would likely be increased VRAM due to the larger textures. We’ve seen VRAM usage of up to ~1500MB. A graphics card with 2GB of VRAM should be sufficient.